Homelab reverse proxy with NGINX
I am a software developer who is passionate about creating innovative and efficient solutions to complex problems. I also enjoy writing about my personal projects and sharing my knowledge with others. I am maintaining a blog to document my coding adventures, share tips and tricks for software development, and discuss interesting topics in computer science.
background
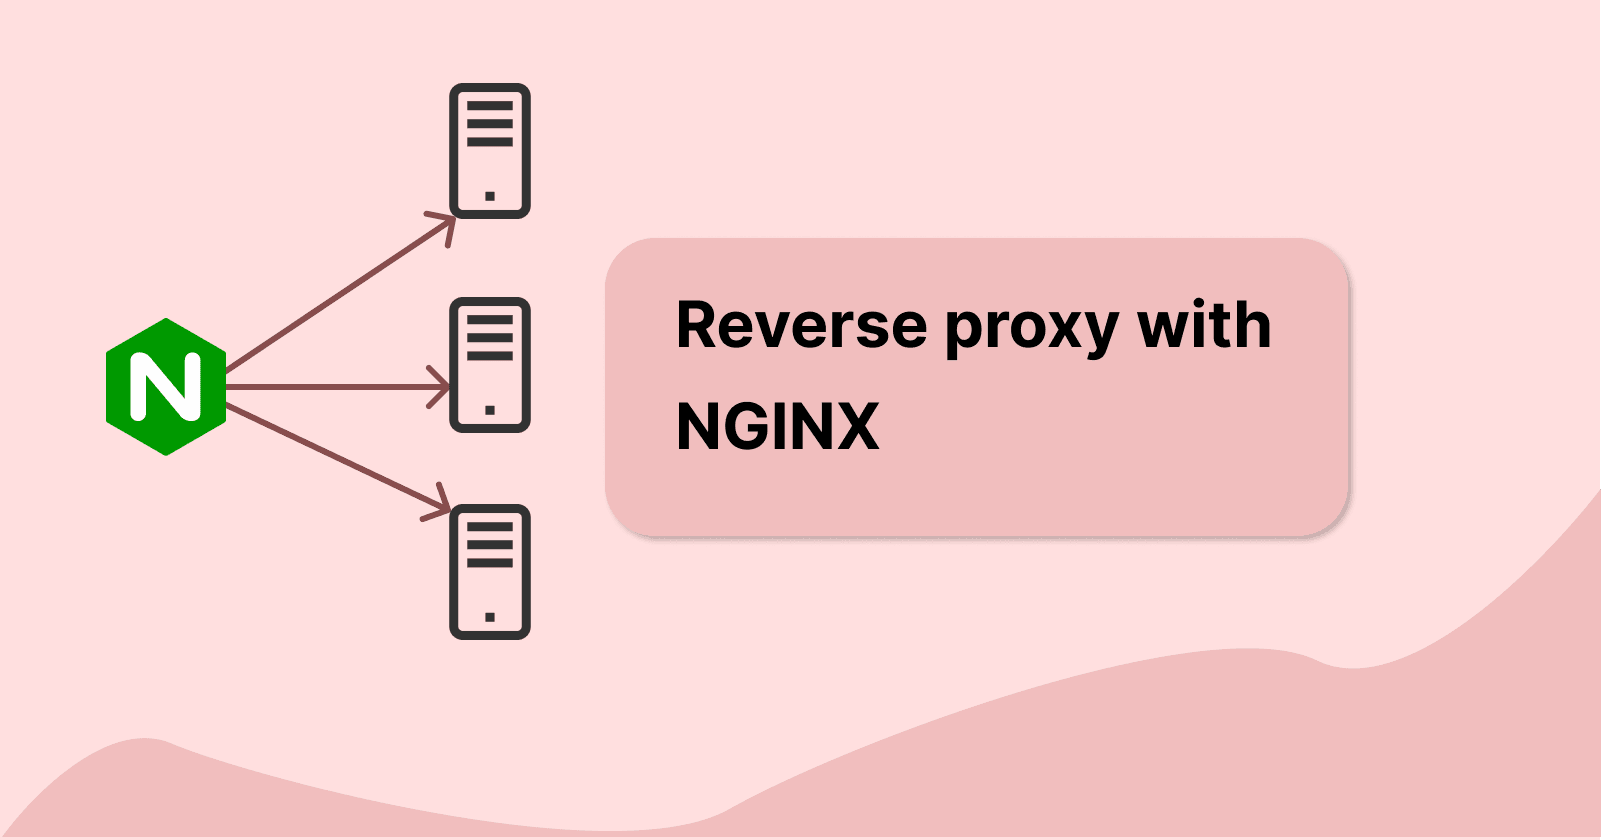
Now we have a bunch of docker containers set up in our internal Linux container. They can be accessed through the IP address of the Linux container, 192.168.1.4 and the respective port number. However, this seems a bit troublesome whenever we need to type it in our web browser URL. Instead, what we will do is create a nginx docker container to handle and redirect all our oncoming network coming in. This nginx will act as a reverse proxy to our backend applications.
what is a reverse proxy?
A reverse proxy is a device or application that can handle requests from clients and redirect the request to other backend services that are managed by us. Our reverse proxy acts as the middleman between the clients and the backend servers. From the point of the client, we are only accessing from a single IP address which is the reverse proxy. The client will not be able to directly access our backend servers' IP address and ports, which improves our security.
Some other notable functions of a reverse proxy include:
load balancing
The reverse proxy can distribute the request between the list of upstream servers provided. This ensures that servers will not be overloaded with requests, which will help our system's stability and latency.
Some reverse proxies can also provide health checks that periodically check the uptime of the upstream server. If the reverse proxy discovers that one of the servers is down, then it can help to redirect the requests to other available servers.
caching
Request can be cached in the reverse proxy for static content to reduce unnecessary queries to the backend for the same content. This helps to reduce the load on our backend servers.
SSL encryption
SSL can be decrypted at the reverse proxy to read the unencrypted data. This data can then be passed to our backend servers without the use of SSL. That way our backend servers will not need to do the decryption themselves, which can free up valuable resources
let's set up our own reverse proxy
Check out the applications we deployed previously here.
The reverse proxy that we will be using is Nginx. Instead of accessing each of our applications deployed previously via their IP address and port number, we will use easy to remember domain names to access our application
Firstly let us configure our DNS server to add the entry in our local DNS record to resolve the domain name to the IP address.
we will resolve
dashy.local, gitea.local, paperless.local, seafile.localto our host machine IP address at192.168.1.4.I am doing this in my own Pi-hole server under Local DNS records. This configuration can also be done on the router which manages the DNS records.
The Pi-hole example is shown below:

Be sure to add both www.XXX.local and XXX.local domains in the records.
Now we can set up a Nginx reverse proxy in our docker environment that listens to all incoming connections to the host machine.
Write a docker-compose.yml file with the contents as shown below:
 version: "1.0"
 services:
   nginx:
     image: nginx:stable
     container_name: nginx
     volumes:
       - /home/internal/nginx/nginx.conf:/etc/nginx/conf.d/nginx.conf
       - /home/internal/nginx/access.log:/var/log/nginx/access.log
       - /home/internal/nginx/error.log:/var/log/nginx/error.log
     ports:
       - "80:80"
Here are some explanations of this ymal file:
image:
We defined a nginx service that uses the
nginx:stableimage to run our application.container_name
container_namehere helps to give our container an easy name to refer to.volumes:
volumeshere we havenginx.confwith our reverse proxy configuration, we will be writing later. We also have theaccess.loganderror.loglinked from our local storage to the container's default log location for nginx to refer to log entries more easily.ports:
Ports here help to expose the ports in our container to our LXC container.
80:80, the right-hand side refers to the port in the container and nginx, while the left-hand side refers to the port on the host machine.Writing our nginx configurations
 server {
     listen 80;
     server_name www.gitea.local gitea.local;

     location / {
         proxy_pass http://192.168.1.4:3000;

         proxy_set_header Host $host;
         proxy_set_header X-Real-IP $remote_addr;
         proxy_set_header X-Forwarded-For $proxy_add_x_forwarded_for;
         proxy_set_header X-Forwarded-Proto $scheme;
     }
 }

 server {
     listen 80;
     server_name www.paperless.local paperless.local;

     location / {
         proxy_pass http://192.168.1.4:8000;

         proxy_set_header Host $host;
         proxy_set_header X-Real-IP $remote_addr;
         proxy_set_header X-Forwarded-For $proxy_add_x_forwarded_for;
         proxy_set_header X-Forwarded-Proto $scheme;
     }
 }

 server {
     listen 80;
     server_name www.dashy.local dashy.local;

     location / {
         proxy_pass http://192.168.1.4:4000;

         proxy_set_header Host $host;
         proxy_set_header X-Real-IP $remote_addr;
         proxy_set_header X-Forwarded-For $proxy_add_x_forwarded_for;
         proxy_set_header X-Forwarded-Proto $scheme;
     }
 }

 server {
     listen 80;
     server_name www.seafile.local seafile.local;

     location / {
         proxy_pass http://192.168.1.4:3001;

         proxy_set_header Host $host;
         proxy_set_header X-Real-IP $remote_addr;
         proxy_set_header X-Forwarded-For $proxy_add_x_forwarded_for;
         proxy_set_header X-Forwarded-Proto $scheme;
     }
 }
Some explanation:
listenkeyword here denotes that nginx is listening to port 80 in the container.server_namehere refers to the domain that nginx is handling, which is important for our domain-based routing.location /block here denotes how the root URL is being handled.proxy_passhere means nginx will forward the incoming request to the specified URL instead, which in this case is our application IP address and port number.proxy_set_headerhere change the headers of our incoming request so that the application knows where did this request originally came from. For example,X-Forwarded-Forheader here is the chain of IP addresses starting from the client IP address all the way to the last proxy IP address before reaching the application. There can be several levels of proxies before it eventually reaches our application.start our nginx server by running
docker compose up -dtry navigating to our applications via
dashy.local,seafile.local,gitea.localorpaperless.localand verify everything is running all right.
We have now implemented our very own reverse proxy 🎉
Here is what it looks like before:

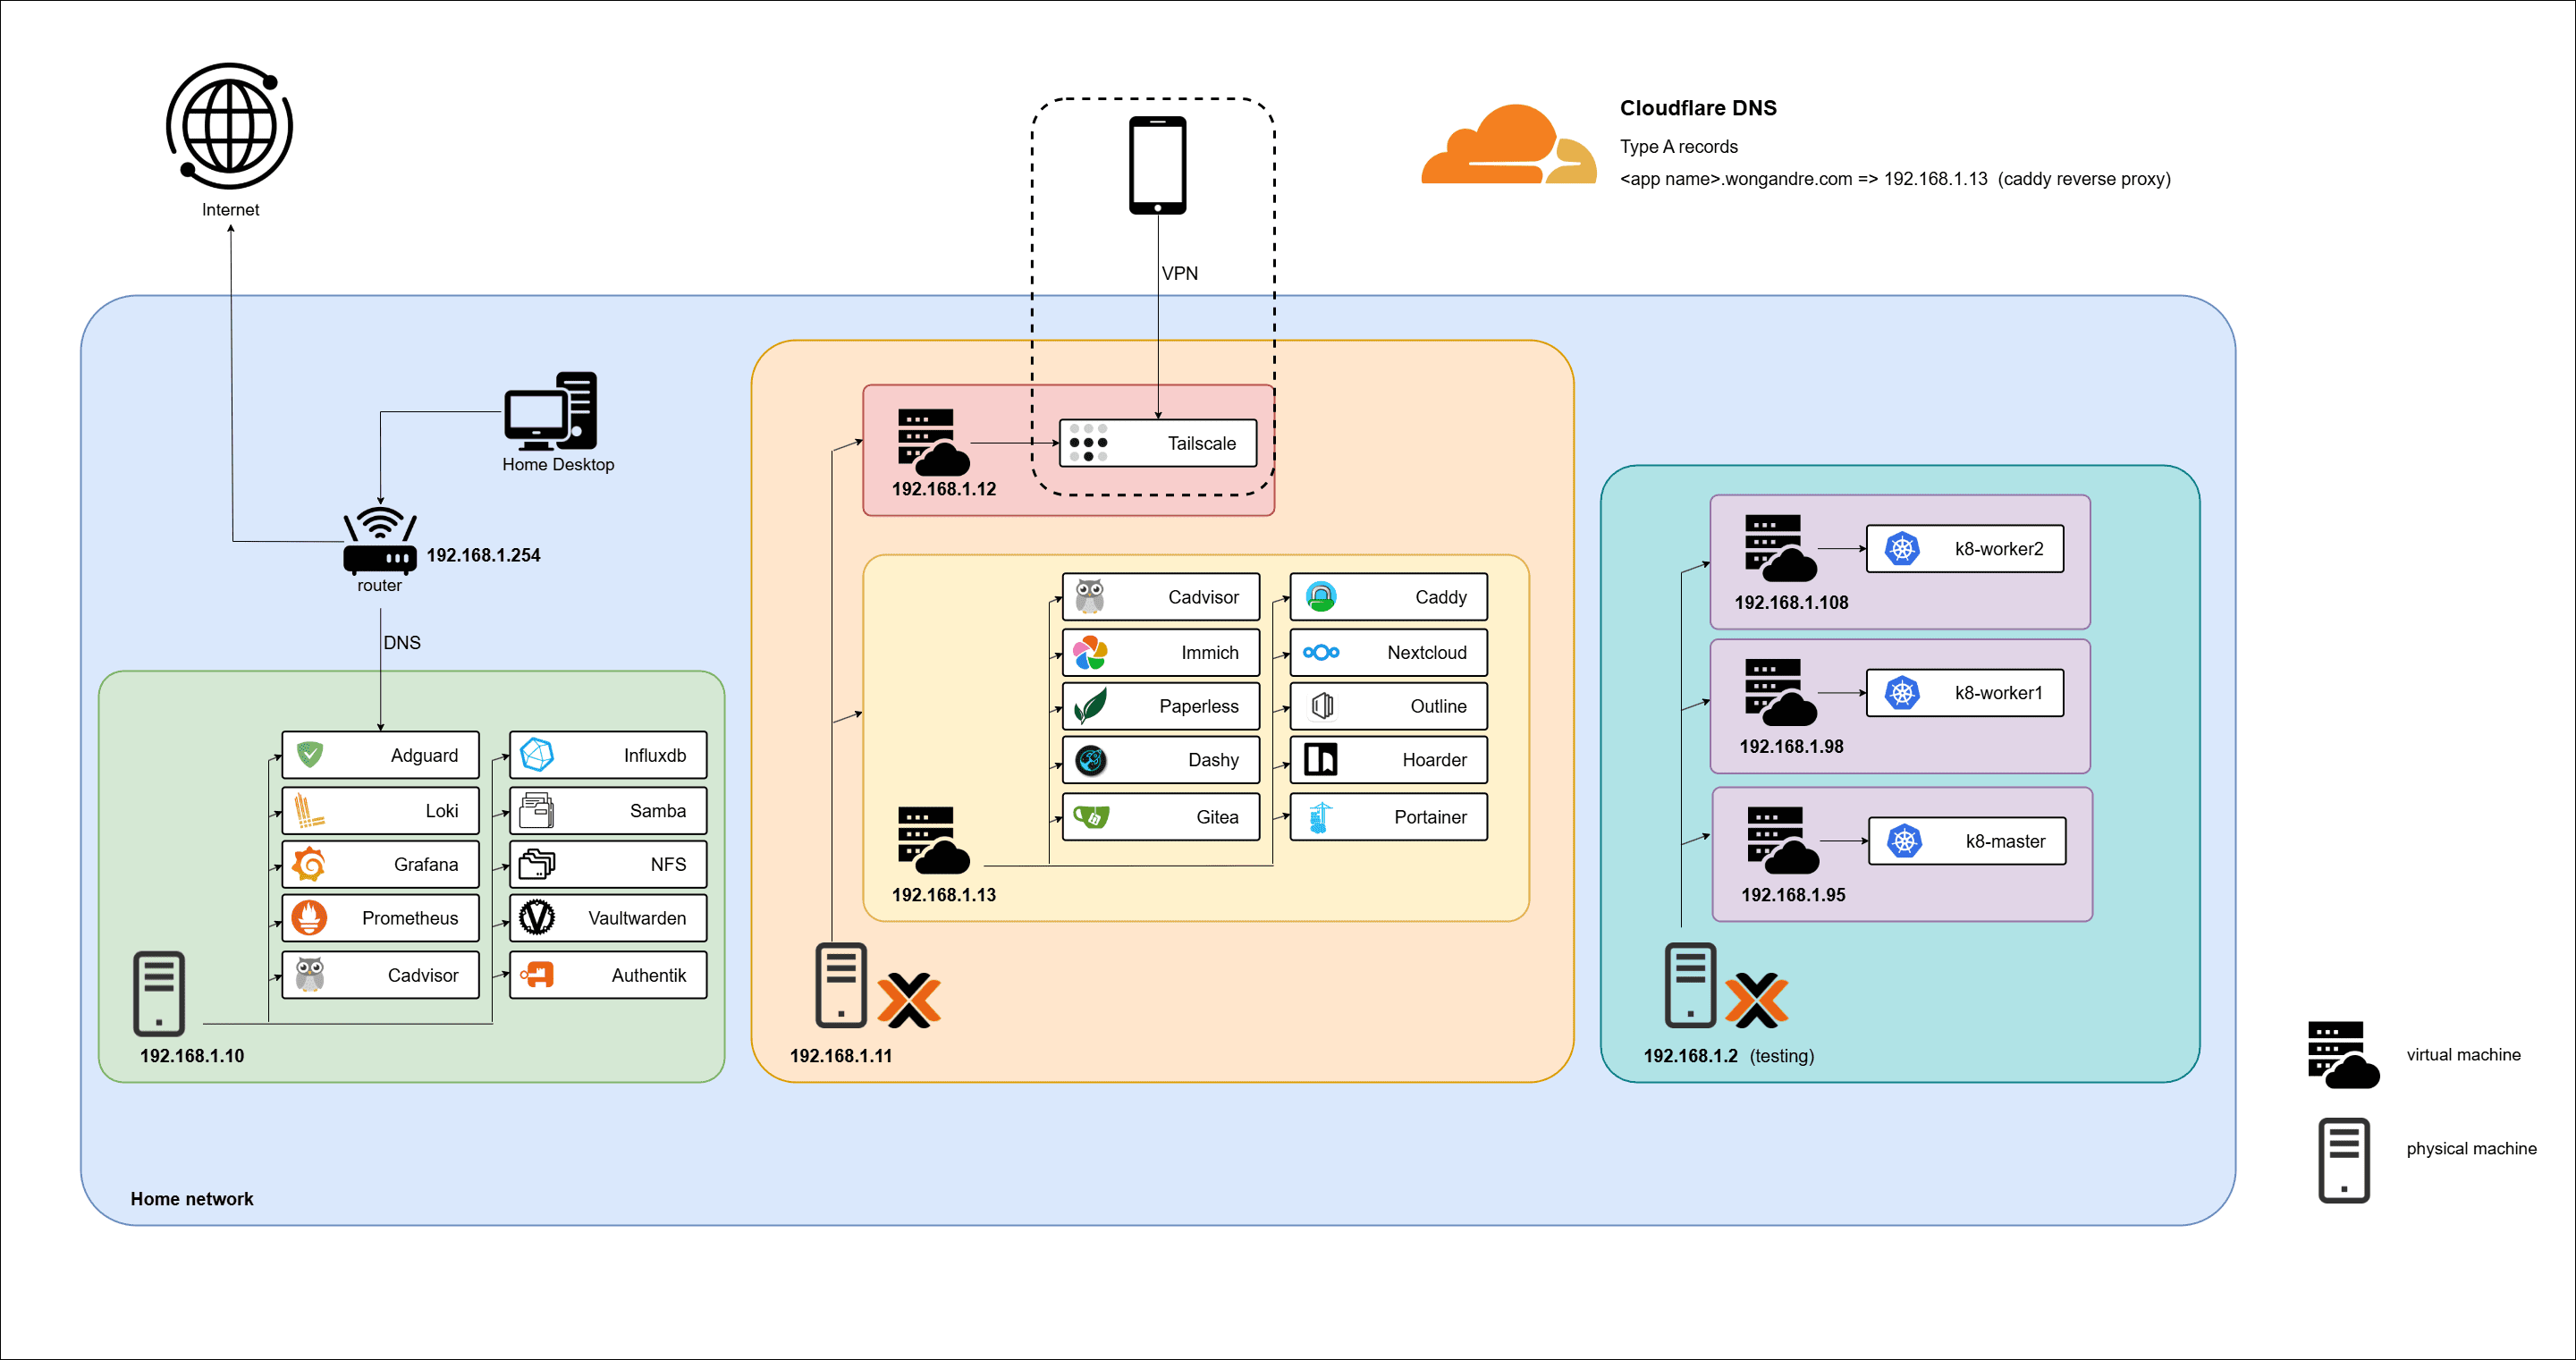
Here is our new updated network flow:

what's next?
In the future, we will be adding SSL security to our nginx so that we can connect via HTTPS instead of HTTP.