Running internal applications on proxmox
I am a software developer who is passionate about creating innovative and efficient solutions to complex problems. I also enjoy writing about my personal projects and sharing my knowledge with others. I am maintaining a blog to document my coding adventures, share tips and tricks for software development, and discuss interesting topics in computer science.
things to do after creating a new container
sudo apt update && apt upgrade
apt install curl
let's install docker now using the quick install script
curl -fsSL https://get.docker.com -o get-docker.sh
sudo sh ./get-docker.sh
now let's create our non-privileged user and call it internal
we wouldn't want to run docker with a root user for security issues. If a user in the docker container managed to break out of it, it may gain root access privileges on the host.
we also need to add this user to the docker group to have access to the docker commands
sudo adduser internal
sudo usermod -aG docker internal
now we can set up a few applications that we can use
For easier access to application files, we will be using docker bind mounts instead of named volume mounts. We will also want the data folders to be located in each of the respective application folders.
set up gitea
Gitea is an application that allows us to host our git repositories
create a
giteadirectory and add adocker-compose.ymlfile. we will be using postgresql for this app.version: "3" networks: gitea: external: false services: server: image: gitea/gitea:1.21.0 container_name: gitea environment: - USER_UID=1000 - USER_GID=1000 - GITEA__database__DB_TYPE=postgres - GITEA__database__HOST=db:5432 - GITEA__database__NAME=gitea - GITEA__database__USER=gitea - GITEA__database__PASSWD=gitea restart: always networks: - gitea volumes: - /home/internal/gitea/data:/data - /etc/timezone:/etc/timezone:ro - /etc/localtime:/etc/localtime:ro ports: - "3000:3000" - "222:22" depends_on: - db db: image: postgres:14 restart: always environment: - POSTGRES_USER=gitea - POSTGRES_PASSWORD=gitea - POSTGRES_DB=gitea networks: - gitea volumes: - /home/internal/gitea/postgres:/var/lib/postgresql/datastart the containers with
docker compose up -dand verify if the link is working at http://<ip>:3000set up paperless-ngx
Paperless-ngx is a document management system that can archive and index important documents so we do not have extra paper or receipts lying around
we can run an easy install script that will auto create our folders and configurations
since we are using volume bind mounts, be sure to set the consume, media and db folders to use absolute paths
bash -c "$(curl -L https://raw.githubusercontent.com/paperless-ngx/paperless-ngx/main/install-paperless-ngx.sh)"verify if the link is working at http://<ip>:8000
set up dashy
Dashy is a homepage organizer to keep tracks of all the links that we will have when we create more applications down the road
create a
dashydirectory and add adocker-compose.ymlfile.--- version: "3.8" services: dashy: image: lissy93/dashy container_name: Dashy # Pass in your config file below, by specifying the path on your host machine volumes: - /home/internal/dashy/data/my-config.yml:/app/public/conf.yml ports: - 4000:80 # Set any environmental variables environment: - NODE_ENV=production # Specify your user ID and group ID. You can find this by running `id -u` and `id -g` - UID=1000 - GID=1000 # Specify restart policy restart: unless-stopped # Configure healthchecks healthcheck: test: ['CMD', 'node', '/app/services/healthcheck'] interval: 1m30s timeout: 10s retries: 3 start_period: 40sstart the containers with
docker compose up -dand verify if the link is working at http://<ip>:4000set up seafile
Seafile is a file hosting system that can keep track of important files and data. Files can be sync across multiple devices as well.
create a
seafiledirectory and add adocker-compose.ymlfile.services: db: image: mariadb:10.11 container_name: seafile-mysql environment: - MYSQL_ROOT_PASSWORD=db_dev # Requested, set the root's password of MySQL service. - MYSQL_LOG_CONSOLE=true volumes: - /home/internal/seafile/mysql/db:/var/lib/mysql # Requested, specifies the path to MySQL data persistent store. networks: - seafile-net memcached: image: memcached:1.6.18 container_name: seafile-memcached entrypoint: memcached -m 256 networks: - seafile-net seafile: image: seafileltd/seafile-mc:11.0.0 container_name: seafile ports: - "80:80" # - "443:443" # If https is enabled, cancel the comment. volumes: - /home/internal/seafile/data:/shared # Requested, specifies the path to Seafile data persistent store. environment: - DB_HOST=db - DB_ROOT_PASSWD=db_dev # Requested, the value should be root's password of MySQL service. - TIME_ZONE=Asia/Singapore # Optional, default is UTC. Should be uncomment and set to your local time zone. - SEAFILE_ADMIN_EMAIL=me@example.com # Specifies Seafile admin user, default is 'me@example.com'. - SEAFILE_ADMIN_PASSWORD=PASSWORD # Specifies Seafile admin password, default is 'asecret'. - SEAFILE_SERVER_LETSENCRYPT=false # Whether to use https or not. # - SEAFILE_SERVER_HOSTNAME=docs.seafile.com # Specifies your host name if https is enabled. depends_on: - db - memcached networks: - seafile-net networks: seafile-net:start the containers with
docker compose up -dand verify if the link is working at http://<ip>:80
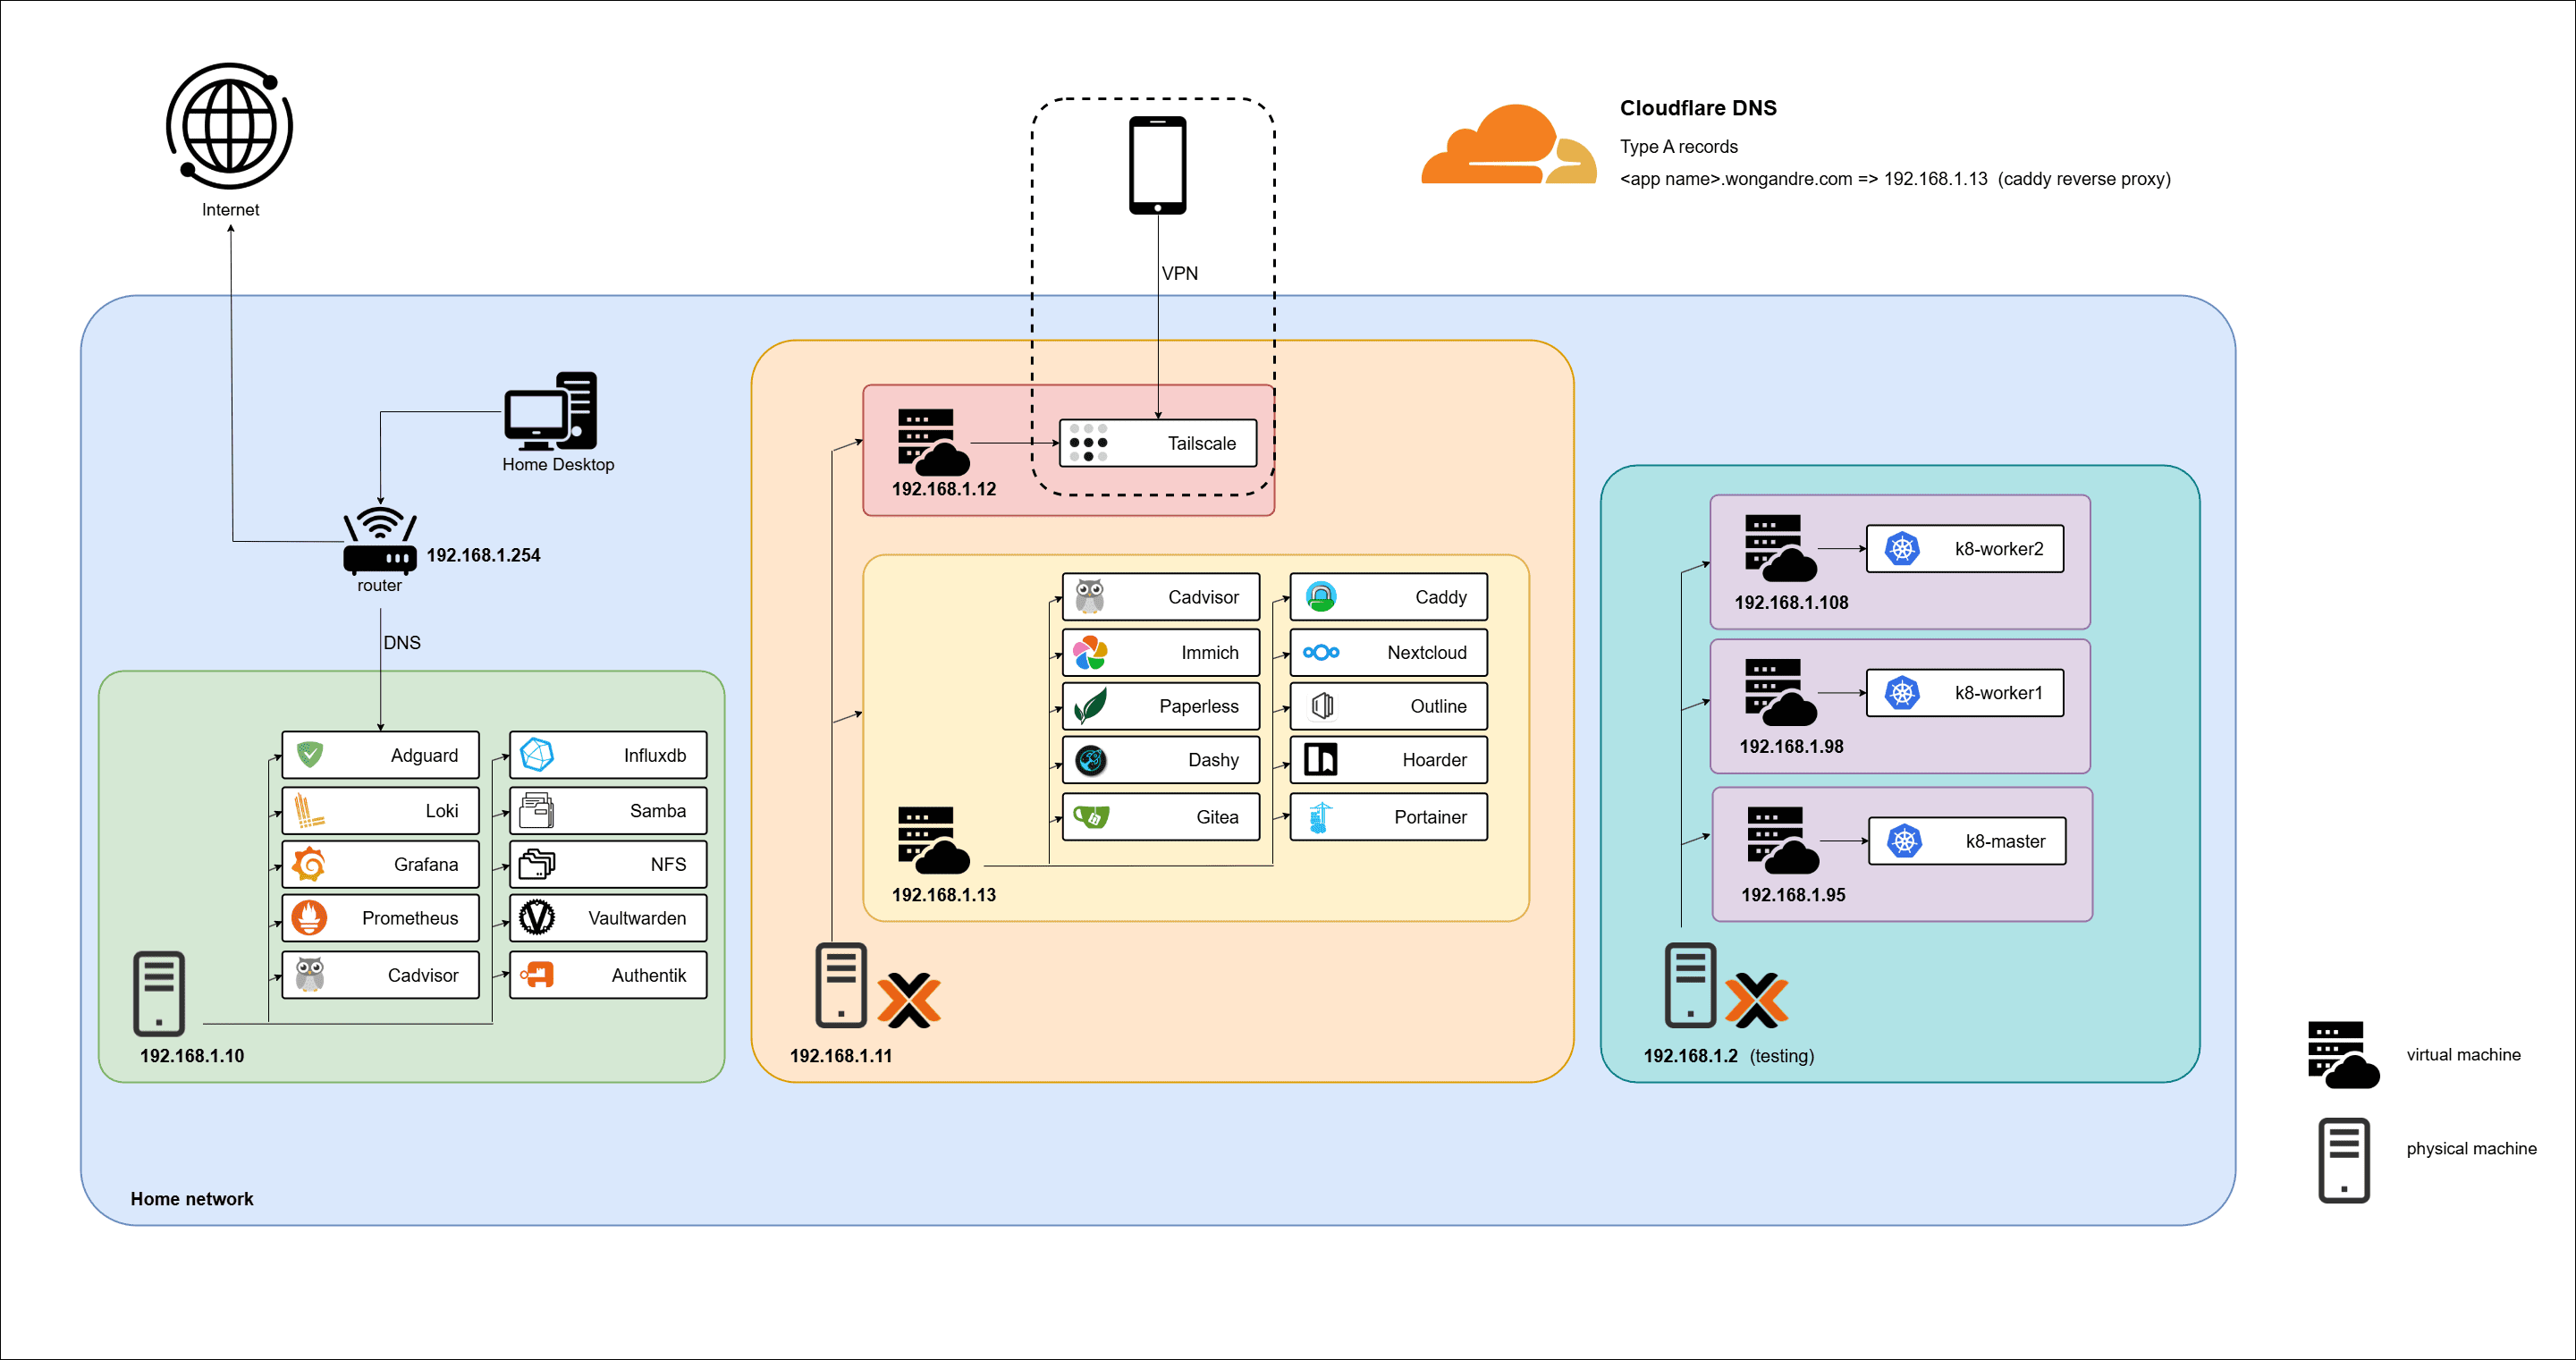
Let's look at our homelab overview again
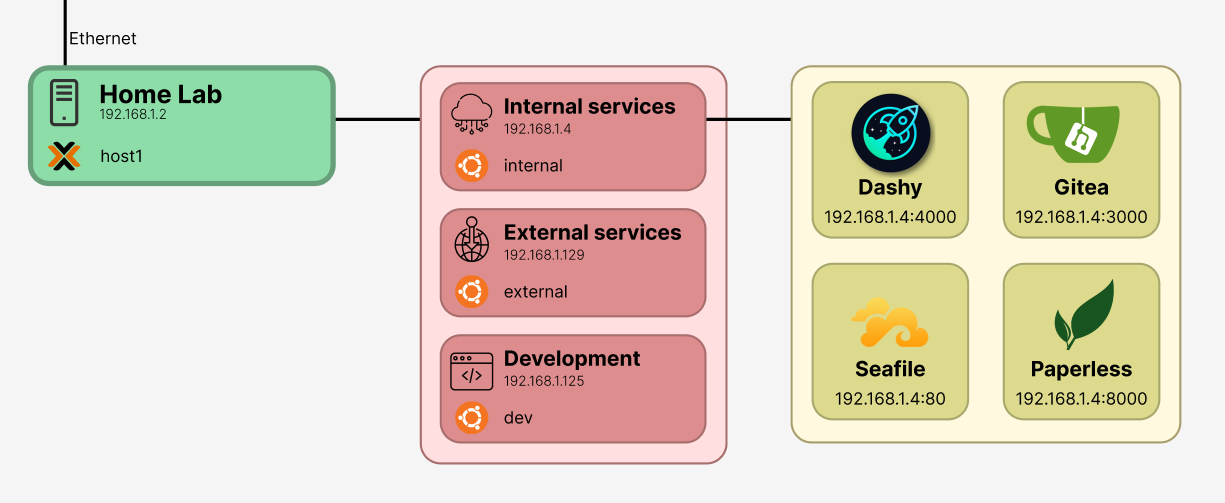
I used a static IP address for my internal Linux container and set it to 192.168.1.4 for easy reference when I want to enter into my web app. This can be changed inside /etc/network/interfaces for Ubuntu.
Manually typing http://192.168.1.4:4000 can be difficult to remember. In the future, we can add a reverse proxy to handle all the connections to our internal docker containers.