Creating my own storage server
Background
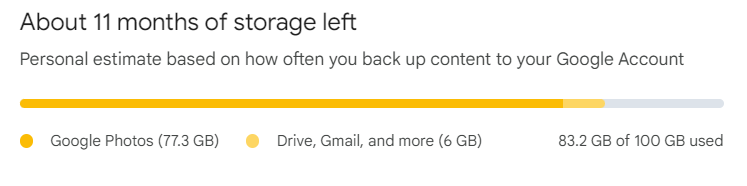
I have been using Google Cloud to store my data such as photos, documents, and emails. I paid about $3 a month for the 100GB plan and recently it is about 80% full.
This prompted me to look for another solution: self-hosting a file server that I can access within my network. This will provide me with much more needed space than the 100GB I have now and also will provide external storage for my Proxmox and Kubernetes projects down the road.
One con of a self-hosted file server is that if the data is corrupted, we might not have a guaranteed way to recover it. This means a backup is crucial if the data stored is important (this can be looked into in the future). Other factors to consider would be power and security. Availability is not an issue for me as files may not be accessed that often.
Hardware
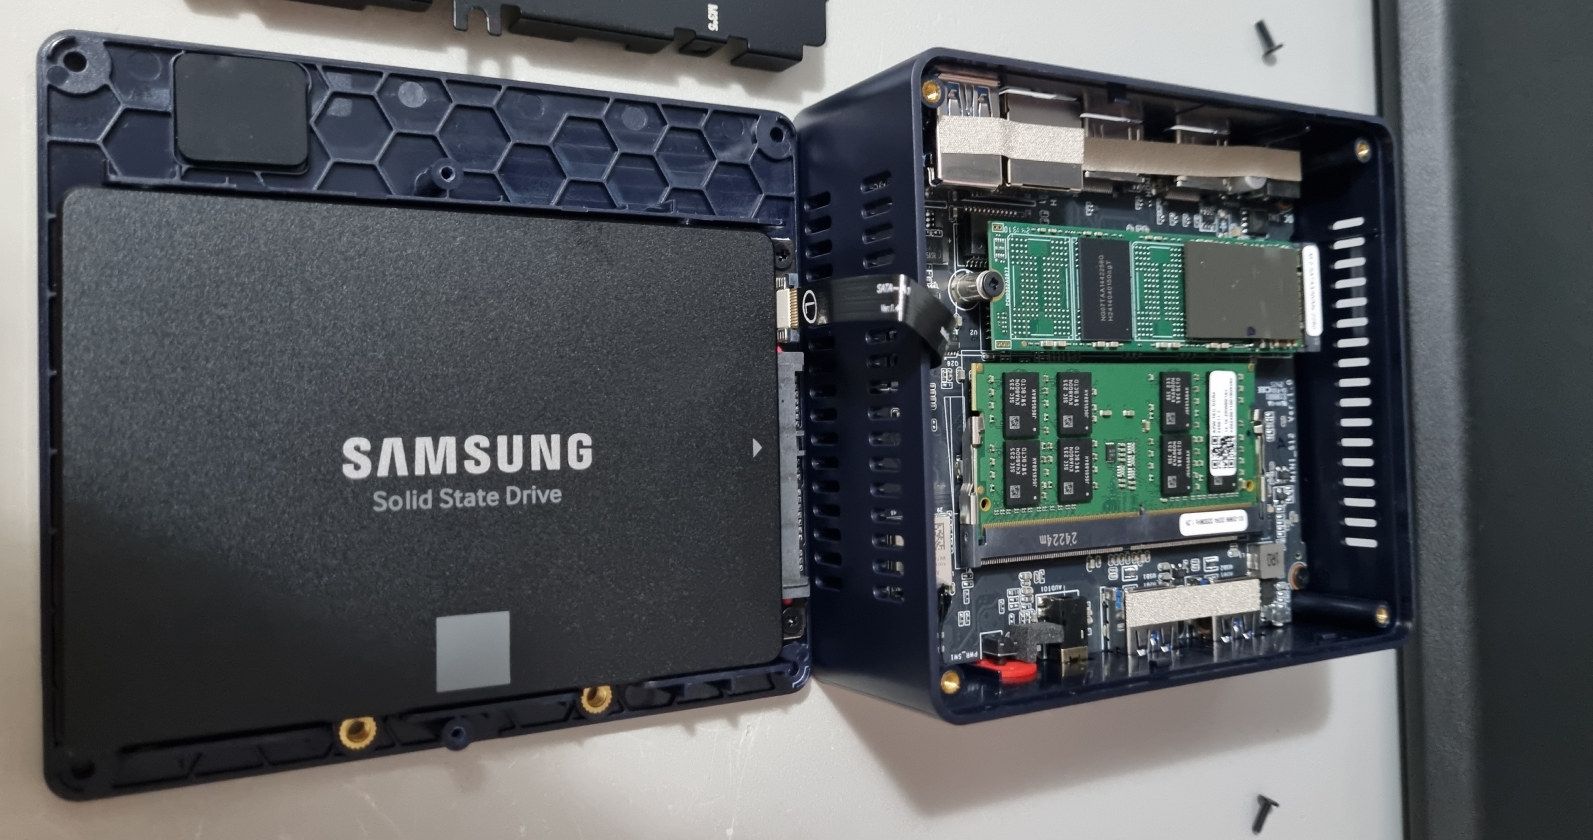
For the main server, I went with a Beelink Mini S12 Mini PC ($240). Here are some of the specifications:
Intel Alder Lake N100 Processor
- it is a low-cost processor with 4 cores and uses very low energy of 6W. Assuming we run it 24 hours in a month of 30 days, we only use about
6/1000 × 24 × 30 = 4.32 kWh/month, looking at the price of electricity right now is 32.57 cents/kWh, so theoretically we are paying about$1.407a month to maintain our server. Seems not too bad.
- it is a low-cost processor with 4 cores and uses very low energy of 6W. Assuming we run it 24 hours in a month of 30 days, we only use about
16GB DDR4 RAM
- 16GB RAM should be ample RAM for our server. The brand of the ram is not stated.
500GB SSD
- 500GB should be enough to run the server’s operating system and host a few applications.
Wi-Fi 6 and Bluetooth 5.2
- I will be using an ethernet cable plugged directly into my router, so Wi-Fi is not that important. Bluetooth can be useful if I want to connect a keyboard to it. Most of the time I will communicate through SSH, so this is not really needed.
For my file storage, I got a 2TB Samsung 870 EVO 2.5-inch SSD ($240).
Installation
I installed an Ubuntu server of version 22.04.5 LTS. Installation instructions can be found on their website.
I then freeze the version of Linux and do an apt update and upgrade
# prevent linux from upgrading itself when it does an upgrade
sudo apt-mark hold $(uname -r)

# upgrade packages
sudo apt update
sudo apt list --upgradable
sudo apt upgrade
Static IP configuration
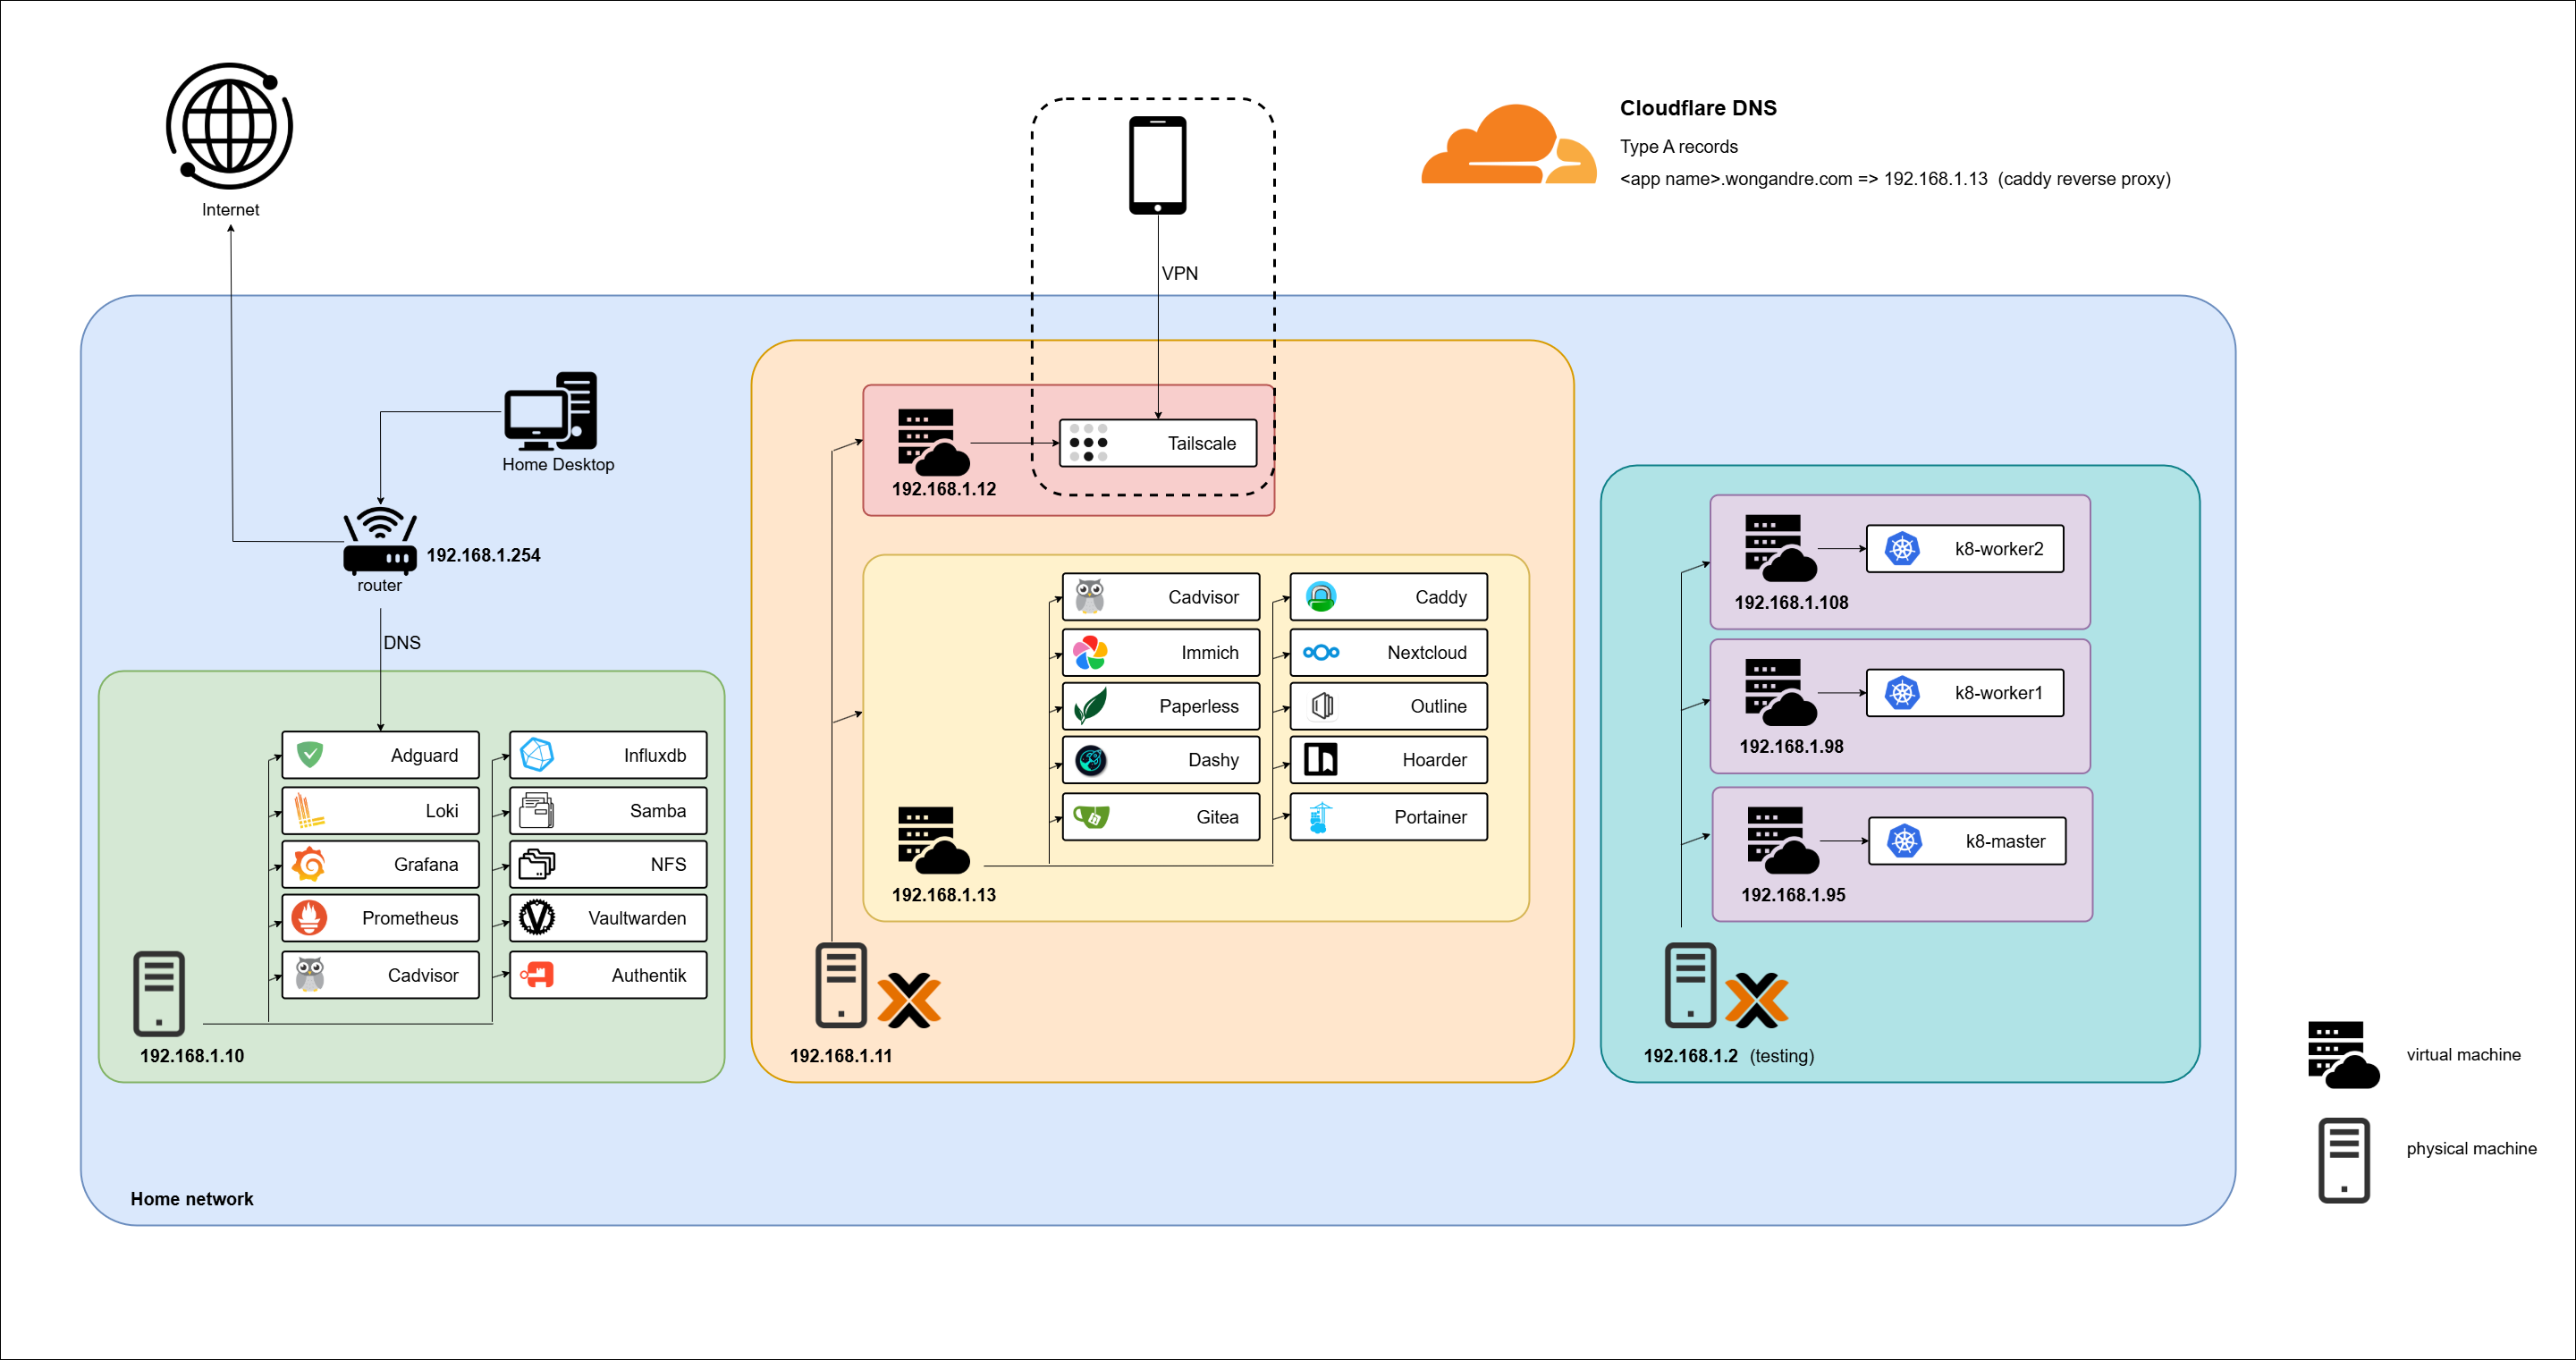
By default, the network automatically uses DHCP to get an IP address from the router. I want mine to be fixed 192.168.1.10 for easy reference. Let’s configure a static IP address for it.
Before changing anything in my /etc/netplan/50-cloud-init.yaml file, the code was:
# This file is generated from information provided by the datasource.  Changes
# to it will not persist across an instance reboot.  To disable cloud-init's
# network configuration capabilities, write a file
# /etc/cloud/cloud.cfg.d/99-disable-network-config.cfg with the following:
# network: {config: disabled}
network:
    ethernets:
        enp1s0:
            dhcp4: true
    version: 2
After adding the IP address that we want to be static:
network:
    ethernets:
        enp1s0:
            dhcp4: no
            addresses: [192.168.1.10/24]
            routes:
                - to: default
                  via: 192.168.1.254
            nameservers:
                addresses: [1.1.1.1,8.8.8.8,8.8.8.4]
    version: 2
dhcp4 is set to no, addresses are set to my static IP 192.168.1.10/24, routes indicate the internal gateway IP address which is 192.168.1.254. Nameservers are the DNS servers for name resolution, 1.1.1.1 for Cloudflare DNS and 8.8.8.8 for Google DNS.
As seen from the comments above, we need to disable the cloud-init by Ubuntu which will override this configuration at every reboot. Add to /etc/cloud/cloud.cfg.d/99-disable-network-config.cfg, network: {config: disabled}.
Run sudo netplan try to apply the changes
Bluetooth configuration
Since our device comes with Bluetooth, it would be great if it can pair with my wireless keyboard.
We need to install bluez package
sudo apt install bluez -y
Entering the command bluetoothctl enters to a mini program.show shows no default controller available, which means my Bluetooth was not being detected.
Looking at the driver’s message by running: sudo dmesg|egrep -i 'blue|firm', there is an error bluetooth hci0: Direct firmware load for intel/ibt-0040-1050.sfi failed with error -2 which means that the Bluetooth firmware was not being loaded. Turns out it was not included in the /lib/firmware/intel/ directory.
To resolve this, we need to download it from elsewhere and do a reboot:
cd /lib/firmware/intel/
sudo wget https://git.kernel.org/pub/scm/linux/kernel/git/firmware/linux-firmware.git/plain/intel/ibt-0040-1050.sfi
sudo wget https://git.kernel.org/pub/scm/linux/kernel/git/firmware/linux-firmware.git/plain/intel/ibt-0040-1050.ddc
reboot
Entering bluetoothctl, we can scan on to scan for nearby devices to pair. pair <address> to initiate the pair. Then scan off to turn off Bluetooth scanning again.
To make it automatically pair upon turning on device, we install the bluez-tool and run the daemon:
sudo apt install bluez-tools -y
bt-agent --capability=NoInputNoOutput -d
--capability=NoInputNoOutput will prevent the agent for asking a confirmation for connection.
New drive configuration
We can take a look at our storage and initialize the SSD we have just added
# looking at the ubuntu storage
sudo fdisk -l /dev/sda
#Disk /dev/sda: 476.94 GiB, 512110190592 bytes, 1000215216 sectors
#Disk model: 512GB SSD
#Units: sectors of 1 * 512 = 512 bytes
#Sector size (logical/physical): 512 bytes / 512 bytes
#I/O size (minimum/optimal): 512 bytes / 512 bytes
#Disklabel type: gpt
#Disk identifier: CA61C6D8-AF70-47CD-B813-C8B689C730AC

#Device       Start        End   Sectors   Size Type
#/dev/sda1     2048    2203647   2201600     1G EFI System
#/dev/sda2  2203648    6397951   4194304     2G Linux filesystem
#/dev/sda3  6397952 1000212479 993814528 473.9G Linux filesystem

# looking at the 2T ssd we added
sudo fdisk -l /dev/sdb
#Disk /dev/sdb: 1.82 TiB, 2000398934016 bytes, 3907029168 sectors
#Disk model: Samsung SSD 870
#Units: sectors of 1 * 512 = 512 bytes
#Sector size (logical/physical): 512 bytes / 512 bytes
#I/O size (minimum/optimal): 512 bytes / 512 bytes

# create a Linux LVM partition using gdisk
sudo gdisk /dev/sdb
n                  # new partition
1                  # partition number
2048 <enter>       # start of sector
3907029134 <enter> # end of sector
8e00               # code for Linux LVM
# result
# Number  Start (sector)    End (sector)  Size       Code  Name
#  1            2048      3907029134   1.8 TiB     8E00  Linux LVM
w                  # write changes
# Do you want to proceed? (Y/N): Y
# OK; writing new GUID partition table (GPT) to /dev/sdb.
# The operation has completed successfully.
Once done, we can use our newly formatted partition and make it into an LVM physical volume
sudo pvcreate /dev/sdb1
# Physical volume "/dev/sdb1" successfully created.

# view our new physical volume
sudo pvdisplay /dev/sdb1
#  "/dev/sdb1" is a new physical volume of "<1.82 TiB"
#  --- NEW Physical volume ---
#  PV Name               /dev/sdb1
#  VG Name
#  PV Size               <1.82 TiB
#  Allocatable           NO
#  PE Size               0
#  Total PE              0
#  Free PE               0
#  Allocated PE          0
#  PV UUID               ZFZ04d-JmAS-lbgt-yF5a-s56v-vXue-sO2sfD
Next, we can add our physical volume to our newly created volume group to host a bunch of logical volumes that we will create later.
sudo vgcreate storage /dev/sdb1
# Volume group "storage" successfully created

sudo vgdisplay storage
#  --- Volume group ---
#  VG Name               storage
#  System ID
#  Format                lvm2
#  Metadata Areas        1
#  Metadata Sequence No  1
#  VG Access             read/write
#  VG Status             resizable
#  MAX LV                0
#  Cur LV                0
#  Open LV               0
#  Max PV                0
#  Cur PV                1
#  Act PV                1
#  VG Size               <1.82 TiB
#  PE Size               4.00 MiB
#  Total PE              476931
#  Alloc PE / Size       0 / 0
#  Free  PE / Size       476931 / <1.82 TiB
#  VG UUID               P6S18y-5mK1-e1eB-c6CS-wiWx-Tkkl-ocmf5T
Next, we can create a bunch of logical volumes, make the filesystem for each logical volume, and then mount them to our Linux
sudo lvcreate -n files -L 100G storage
# Logical volume "files" created.
sudo lvcreate -n photos -L 100G storage
# Logical volume "photos" created.

# check our logical volume
ls /dev/mapper/storage*
# /dev/mapper/storage-files  /dev/mapper/storage-photos

# make filesystem on logical volume
sudo mkfs -t ext4 /dev/mapper/storage-files
sudo mkfs -t ext4 /dev/mapper/storage-photos

# make mount directories
sudo mkdir /mnt/files
sudo mkdir /mnt/photos

# mount logical volumes
sudo mount /dev/mapper/storage-files /mnt/files/
sudo mount /dev/mapper/storage-photos /mnt/photos/

# view result
df -h
# Filesystem                         Size  Used Avail Use% Mounted on
# /dev/mapper/ubuntu--vg-ubuntu--lv   98G  7.2G   86G   8% /
# /dev/sda2                          2.0G  126M  1.7G   7% /boot
# /dev/sda1                          1.1G  6.1M  1.1G   1% /boot/efi
# /dev/mapper/storage-files           98G   24K   93G   1% /mnt/files
# /dev/mapper/storage-photos          98G   24K   93G   1% /mnt/photos
The good thing about logical volume is we can always add space if we slowly start running out. To resize, we can run lvextend and resize2fs -p.
To make sure our logical volumes are mounted automatically when we boot into our system, update the fstab file as so:
# /etc/fstab: static file system information.
# <file system> <mount point>   <type>  <options>       <dump>  <pass>
# other mounts ...
# my own mounts
/dev/mapper/storage-files /mnt/files ext4 defaults 0 2
/dev/mapper/storage-photos /mnt/photos ext4 defaults 0 2
The first 2 columns are the file system, and the mount point paths, the 3rd column is the type of file system. The 4th column is additional options that we set to defaults. The 5th column is for the dump command that we will disable. The 6th column sets the order in which the check disk commands run, 0 for no checking, 1 for the root drive, and 2 for other drives.
SSH configuration
To make login easier, we can do password-less authentication during ssh.
On our client's PC to connect, create our public and private RSA key pair via ssh-keygen. Follow the instructions shown by pressing enter.
Then copy the public key over to the server:
ssh-copy-id -i ~/.ssh/id_rsa.pub andre@192.168.1.10
Now we can ssh without entering the user password every time.
Network file server configuration
install the required server app and edit configurations related to the nfs server

# install the nfs server
apt install nfs-kernel-server

# edit /etc/exports
# assuming that we only have 1 ip client from 192.168.1.106
/mnt/files 192.168.1.106(rw,sync,no_subtree_check)
/mnt/photos 192.168.1.106(rw,sync,no_subtree_check)

# export the changes
sudo exportfs -rav

# update nfs-kernel-server settings
vim /etc/default/nfs-kernel-server
# change to RPCVCGSSDOPTS="-N 2 -N 3"
# this removes version 2 and 3 of nfs and only runs nfs version 4


# restart the server
sudo systemctl restart nfs-kernel-server
configure the firewall for access
  sudo ufw allow from 192.168.1.106 to any port 2049

  sudo ufw enable

  # check firewall status
  sudo ufw status
  # Status: active
  # To                         Action      From
  # --                         ------      ----
  # 22/tcp                     ALLOW       Anywhere
  # 2049                       ALLOW       192.168.1.106
  # 22/tcp (v6)                ALLOW       Anywhere (v6)
Ensure that the directory under
/mnt/filesand/mnt/photosare the ownership of the start user id of1000id 1000 # uid=1000(andre) gid=1000(andre) groups=1000(andre),4(adm),24(cdrom),27(sudo),30(dip),46(plugdev),110(lxd) # update ownership of dir sudo chown -R andre:andre /mnt/files sudo chown -R andre:andre /mnt/photosOn the client PC that we want to connect to our nfs, we can install the nfs-common package
  sudo apt install nfs-common

  # try to mount nfs on client machine
  sudo mount -t nfs -vvv 192.168.1.10:/mnt/files /mnt/files

  # show mounts
  mount -t nfs4
  #192.168.1.10:/mnt/files on /mnt/files type nfs4 (rw,relatime,vers=4.2,rsize=1048576,wsize=1048576,namlen=255,hard,proto=tcp,timeo=600,retrans=2,sec=sys,clientaddr=192.168.1.106,local_lock=none,addr=192.168.1.10)

  # once mounted we can write to the nfs directory
  # should be able to write if client user id is also 1000
  echo "hello world" > /mnt/files/testfile
To automatically mount the NFS every time the client machine starts up, we can update the
/etc/fstabfile# /etc/fstab 192.168.1.10:/mnt/files /mnt/files nfs bg,rsize=8192,wsize=8192 0 0Where
bgis an option to run the mount in the background later if the mount fails.rsizeandwsizesets the buffer size for reading and writing, by default it is1024.
Samba file server configuration
create a new logical volume for samba and mount directory
  # new logical volume
  sudo lvcreate -n sambashare -L 200G storage
  sudo mkfs -t ext4 /dev/mapper/storage-sambashare

  # new mount dir
  sudo mkdir /mnt/sambashare
  sudo chown -R andre:andre /mnt/sambashare

  # mount or add to /etc/fstab
  sudo mount /dev/mapper/storage-sambashare /mnt/sambashare
install the required server apps and edit configurations
  sudo apt install samba -y

  # edit config
  sudo vim /etc/samba/smb.conf
  # optionally comment out printers under [printers] and [print$]
  # add the lines below
  #[sambashare]
  #  comment = Samba on Ubuntu
  #  path = /mnt/sambashare
  #  read only = no
  #  browsable = yes

  # start smb service
  sudo systemctl start smbd.service
now we can connect via Windows by providing the IP address of our Samba server to the file explorer
To mount samba via Linux as follows:
sudo mount -t cifs -o user=andre //192.168.1.10/sambashare /mnt/test
Conclusion
We have set up a mini pc capable of sharing storage through NFS and Samba. We can then access these storages via other Linux system via the NFS clients or on Windows samba share client.
About the author
I am a software developer who is passionate about creating innovative and efficient solutions to complex problems. I also enjoy writing about my personal projects and sharing my knowledge with others. I am maintaining a blog to document my coding adventures, share tips and tricks for software development, and discuss interesting topics in computer science.
Comments
Join the discussionNo comments yet. Be the first to comment.